Find all the frequently asked questions – both technical and practical – to help you get to grips with our extensions.
Are you still having difficulties?
Use our FAQtastic chatbot in the bottom right-hand corner to describe the problem you’re experiencing in your own words. If our chatbot can’t find a relevant answer, it will offer to let you submit your question to us directly.
Do I need to know how to programme in order to integrate content from Apidae?
Je ne connais pas bien WordPress est-ce difficile de modifier des contenus d’ApidaePress ? J’aimerais intégrer du contenu ApidaePress mais je ne sais pas comment faire, je ne suis pas développeur-se est-ce que je peux gérer moi-même du contenu ApidaePress ? Je souhaite reprendre mon contenu ApidaePress mais je ne sais pas programmer, je souhaite personnalisé mes contenu ApidaePress avec quelques modifications technique c’est possible ? Je veux surpasser le design et la présentation de mes contenus Apidae, est-ce possible avec ApidaePress ?
Not at all!
Our approach with composition blocks allows you to create layouts directly with your mouse, without leaving the WordPress editor. Once the settings have been made, everything happens in the dashboard, with an intuitive interface that takes into account your theme settings.
You do not need any programming or graphic design skills!
Of course, this does not prevent technical and creative profiles from adding customised overlays.
Can I apply my website templates to content from Apidae?
Mon design sera-t-il appliqué dans l’agenda ApidaePress ? Le plugin APidaePress récupère-t-il les styles du thème ou faut-il créer du style à part ? Dois-je prévoir un temps supplémentaire dans mon installation d’ApidaePress pour créer un style d’habillage qui colle avec mon thème ?
Absolutely!
Our philosophy is to give users control by relying on WordPress standards. To this end, we have created a multitude of composition blocks to allow designers to give free rein to their imagination.
Can I use Apidaepress without an Apidae account?
Est-ce que je peux créer un agenda culturel sans compte Apidae dans ApidaePress ? APidaePress peut-il fonctionner tout seul ?
No.
The content of Apidae is only accessible through the Apidae API, which requires an account.
Accounting for WooCommerce – Pro Module
Comment ajouter une colonne supplémentaire à mon export comptable ?
Vous utiliser des champs personnalisés sur vos commandes ou une extension qui apporte de propriété, je veux personnalisé mon export comptable, est-ce que Comptabilité pour Woocommerce prévoit des réglages pour ajouter des colonnes dans les exports ?
Solution
Cette fonctionnalité n’est pas une option native.
Il est toutefois possible d’utiliser les 4 colonnes vides pour insérer du contenu aux exports comptables.
Le tutoriel suivant s’adresse aux développeurs et agences, car il nécessite un peu de programmation.
Chaque ligne de l’export dispose d’un crochet (hook) de type : woocommerce_accounting:export:order_output_*_line.
Par exemple, pour ajouter l’adresse de livraison indexée (pourquoi pas ?) :
Comment exporter les numéros de compte spécifiques par article ?
J’ai des numéro de compte qui dépendent des articles, comment les exporter pour qu’ils aient tous un numéro différent pour éviter les doublons dans mes exports ? Comment paramétré la valeur spécifique de chaque produit dans un export comptable ?
Context
Vous avez saisi un numéro de compte générique pour les produits (par exemple 707000) et des numéros spécifiques pour certains produits (707001, 707002) mais dans l’export, tous les produits on le numéro 707000.
Solution
L’export comptable propose plusieurs options, notamment le mode de chaque champ : générique ou détaillé.
Le mode générique utilise la valeur par défaut, renseignée dans les réglages généraux.
Le mode détaillé utilise la valeur spécifique de chaque élément, avec un point de chute sur la valeur par défaut si nécessaire.
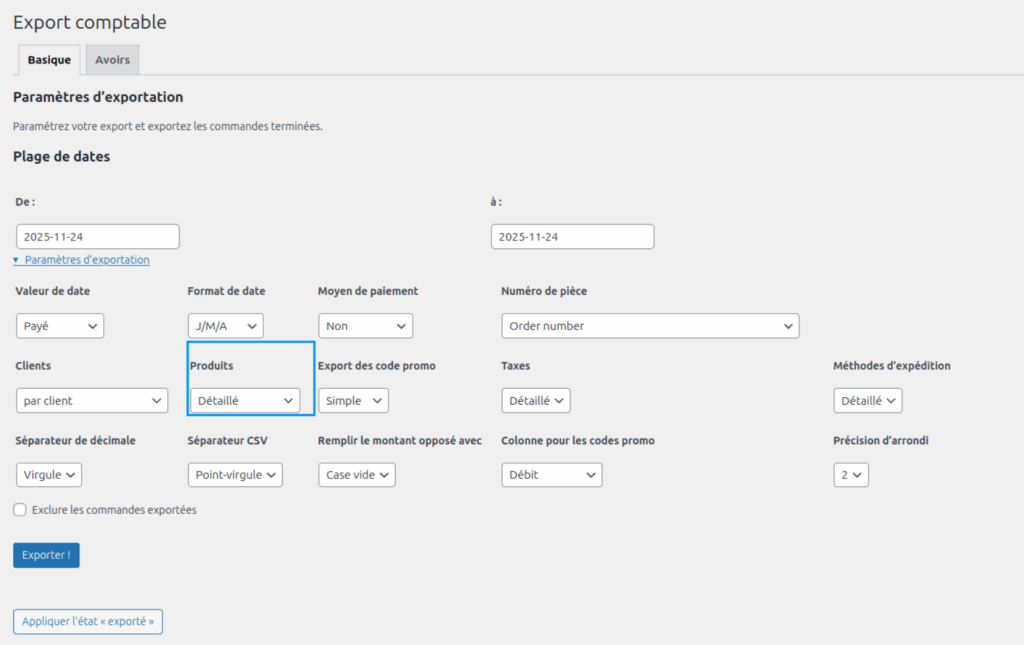
Pour exporter avec les numéros spécifiques de chaque produits, sélectionnez l’option « détaillé » du champ produits.
Comment exporter vos commandes WooCommerce vers EBP Comptabilité avec "Comptabilité pour WooCommerce"
Je veux exporter mes commande, gestion des commandes avec EBP, gestion des commandes avec Comptabilité pour Woocommerce, installer Comptabilité pour Woocommerce
Do you have a WooCommerce online store and want to export your completed orders to your accounting software? Here's how to do it!
Prerequisite: Install the “Accounting for WooCommerce” extension.
Download and install “Accounting for WooCommerce,” either the Freemium or Professional (paid) version.
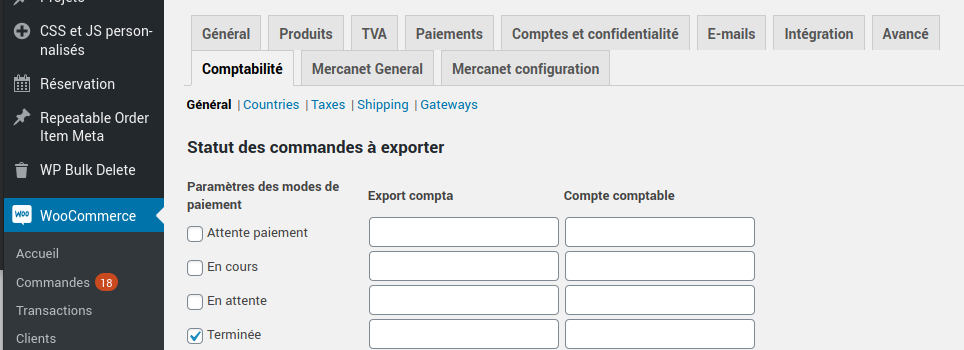
In the WordPress admin interface, go to “WooCommerce > Settings,” then to the “Accounting” tab.
You can then define your accounting codes for each type of accounting information: products, taxes, shipping costs, payment methods, accounting ledger, cost accounting, based on payment methods, order status, etc.
Cliquez sur l’image pour agrandir
Export order status: for each order status, you can define a different accounting account (Awaiting payment, In progress, Pending, Completed, Cancelled, Refunded, Failed).
For Products, define a default Accounting Account and Analytical Code.
For Customers, set a default Accounting Account.
For taxes and shipping methods, set a default accounting account and an analytical code for shipments.
For your Promotions, define an Accounting Account and an Analytical Code.
For your Sales Journal Code.
For Exceptional credits and expenses, define a General ledger account.
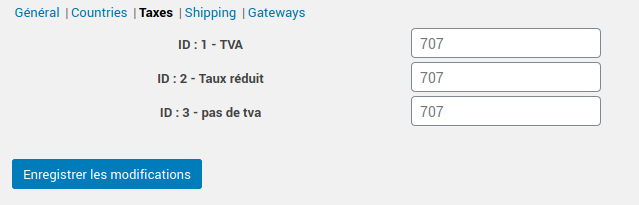
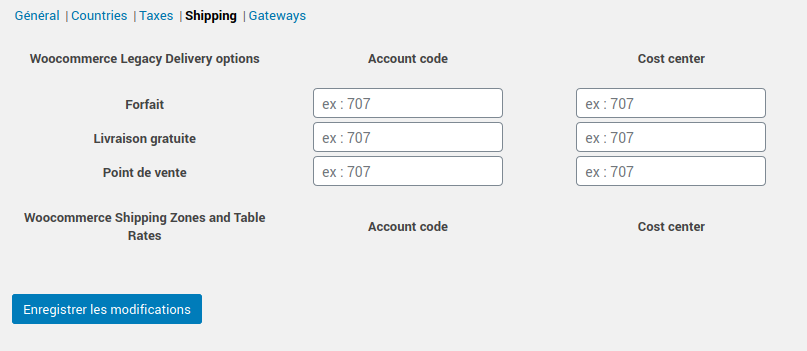
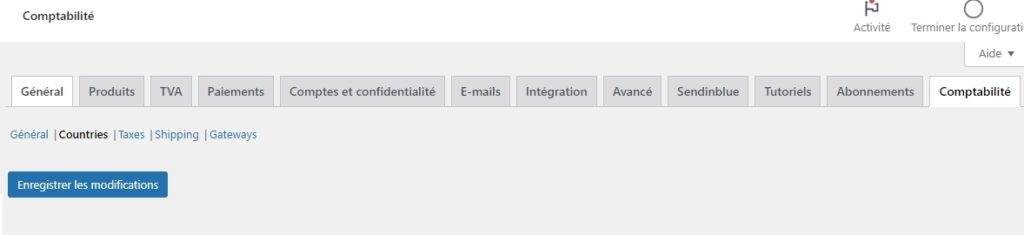
There are 5 tabs available, allowing you to edit the specific accounting codes for the different settings you have defined in WooCommerce:
Countries
Taxes (TVA types)
Shipping costs
Payment methods
edit accounting codes for each type of VAT
define your accounting codes for each delivery method
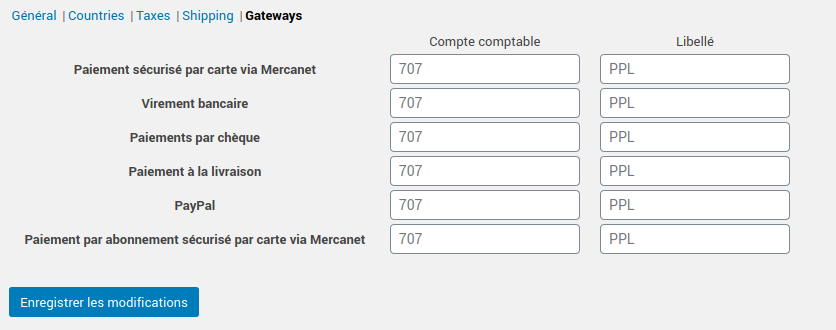
set up different accounting codes for each payment method offered
In the Pro version
First, define general accounting codes, as explained above.
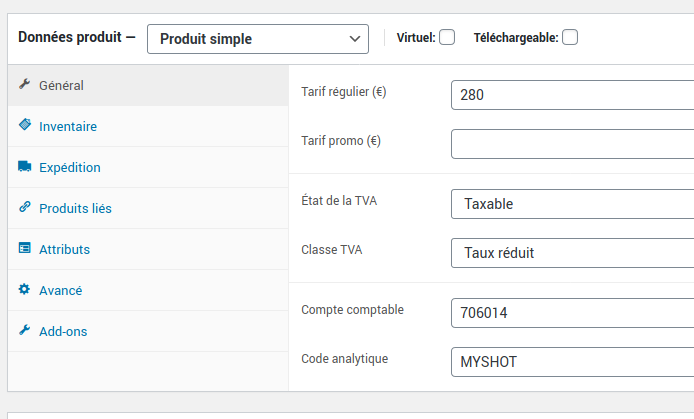
Then, for each of your products, you can enter a accounting code and an analytic code.
Your detailed accounting
Integrate your detailed chart of accounts. Define detailed accounting codes for each product, taxes, shipping costs, payment methods, accounting ledger, analytical accounting codes.
We recommend using import software if you want to enter all values quickly—especially if you have a large product catalog. You can easily do this using import/export extensions for your data, such as WP All Import.
2. Configure the data to be exported to EBP accounting
Return to the settings for the “Accounting for WooCommerce” extension from the WordPress admin panel: “WooCommerce > Settings,” then go to the “Accounting” tab.
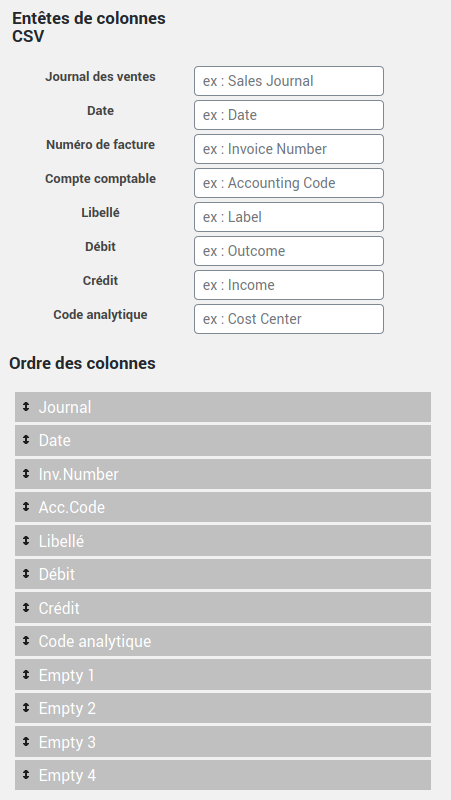
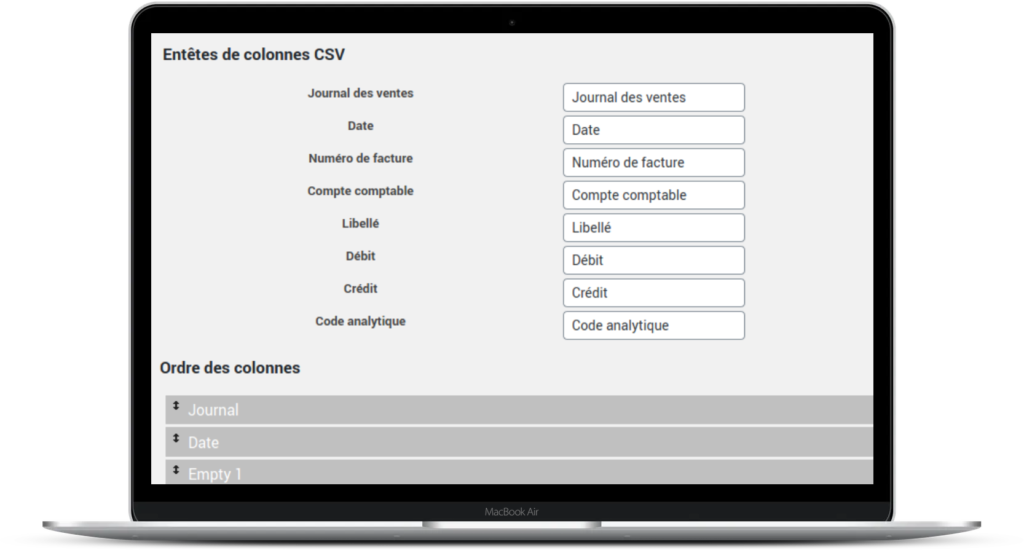
At the bottom of the general settings page, you can define column headers from your export file, as well as their order.
Export whatever you want to wherever you want!
3. Export your entries from WooCommerce
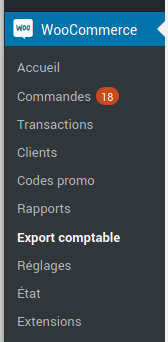
To export your orders to your accounting software (EBP, Ciel, or other), simply go to “WooCommerce > Accounting Export.”
You can then choose what you want to export:
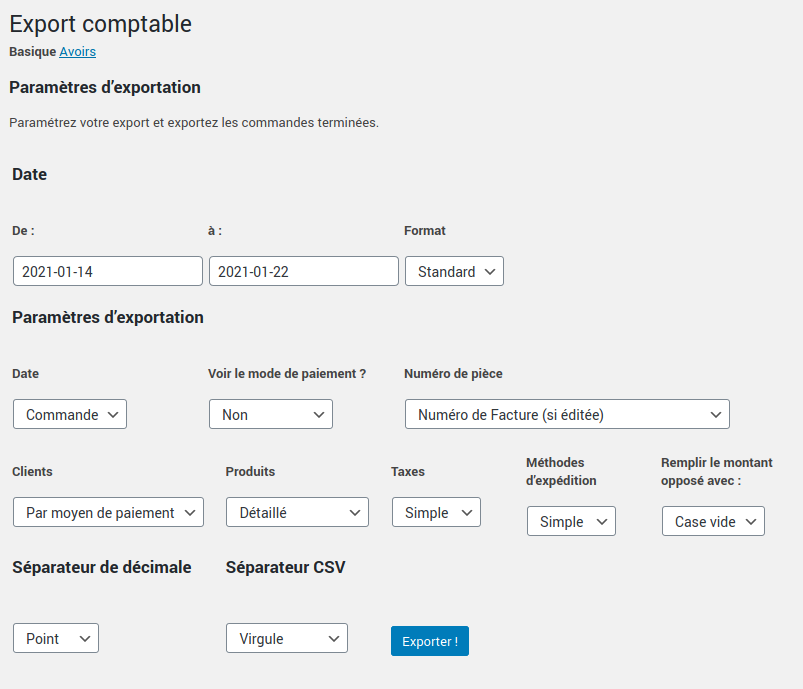
Define the parameters for your accounting export
Here are all the export criteria you can configure:
Start and end date of export, choosing the date format
Date: of order, confirmation, payment, invoicing
View payment method, or not
Document number (invoice or order number)
Customers (by customer or by payment method)
Products (simple or detailed)
Taxes (simple or detailed)
Shipping methods (simple or detailed)
Fill in the opposite amount with: empty box or “0” (depending on your import preferences in your accounting software)
Decimal separator type (period or comma)
CSV separator (comma, semicolon, or tab [used for TSV format])
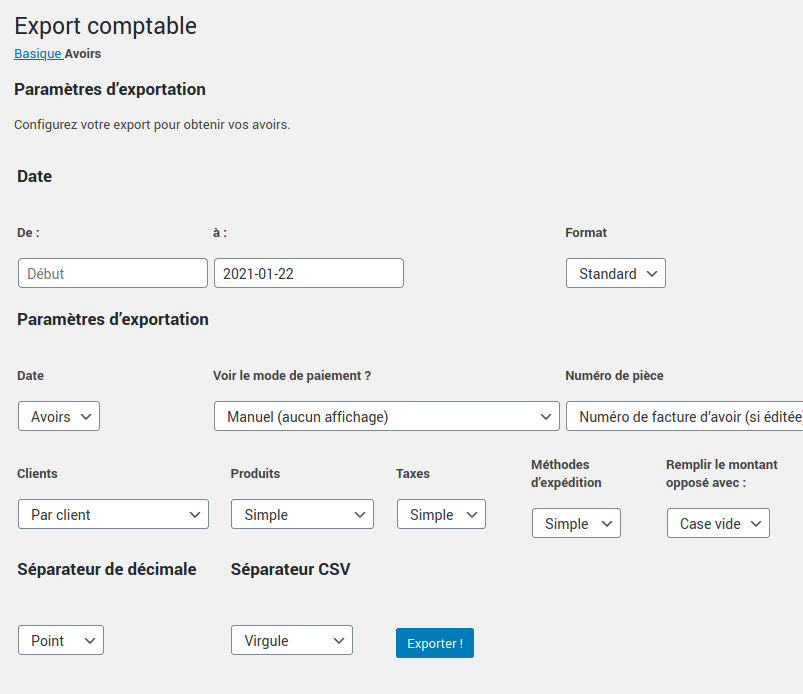
Export your assets
You can also export your credit notes to your accounting software by clicking on the “Credit Notes” tab (at the top of the page).
Comment faire fonctionner l'extension “export comptable” ?
je ne sais pas comment utiliser export comptable
First, ensure that your site has the free version. Next, check that the free version is activated. If the free version is not installed and activated, the extension will not work.
Comment personnaliser les libellés dans l'export comptable WooCommerce ?
Je souhaite modifier les noms des colonnes de mon export comptable, comment faire ? Je veux modifier le nom de mes colonnes avant l’export de mes commandes dans le module Comptabilité pour Woocommer ce, modifier les libellés dans export
You can customise the values of the columns in the export file using the square bracket woocommerce_accounting:export:order_value.
For example, to have the value 'Invoice N-XXXX FIRST NAME LAST NAME'
// N° de piece
$order->number;
// Date
$order->piecedate;
// Numéro de compte
$order->account_cust;
// Débit
$order->outcome;
// Crédit
$order->income;
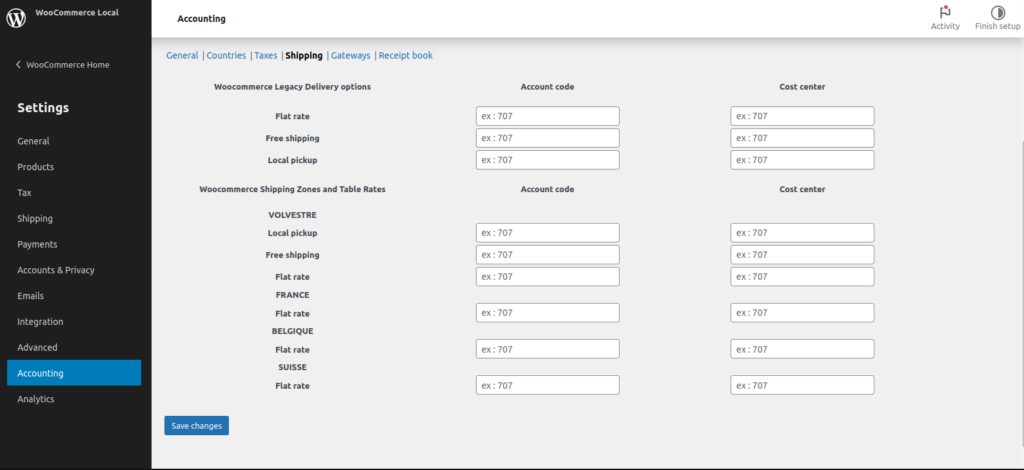
How do I enter the account numbers for each country for shipping costs?
Comment faire pour lier les numéros de comptes par pays ? Lier les numéros de compte pour les frais de port par pays
Context
Vous avez une boutique en ligne qui vend des produits à l’international ? You have configured all the account numbers but you do not see where to enter the differentiated account numbers by country.
Solution
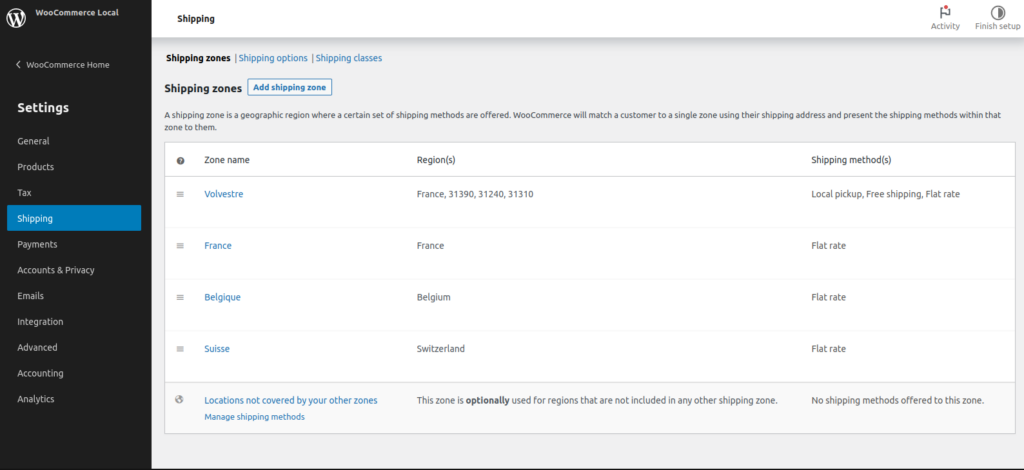
This requires having configured the different shipping areas. WooCommerce Accounting is based on WooCommerce’s shipping areas.
Shipping zonesShipping accounting settings of WooCommerce Accounting
How to use invoice numbers generated by WooCommerce PDF Invoices & Packing Slips?
Je génère des numéros de facture avec une extension PDF invoices & Packaging Slips, Comment utiliser les numéros de facture généré par une extension dans Woocommerce ?
Comment utiliser les numéros de facture avec Comptabilité pour Woocommerce ?
If you use WooCommerce PDF Invoices & packing Slips, a specific setting will be displayed on the settings page to allow you to use the invoice number in your export.
Does your extension comply with the new GDPR standards?
comment savoir si mon plugin est conforme RGPD ? Vérifier les normes RGPD, adaptation nouvelles normes
Pursuant to article 15 of the General Data Protection Regulation, we inform you that our extension does not create new files. Indeed, exports are generated on the fly, without storage on your server.
More generally, our extension does not store any folders or files and does not use cookies. It therefore complies with the new GDPR standards of April 1, 2021.
Examples of complex cases involving taxes
Je vend des produits dans plusieurs pays où des taxes différentes peuvent s’appliquer. Je souhaite appliquer des réductions sur un produit qui contient plusieurs types de taxes.
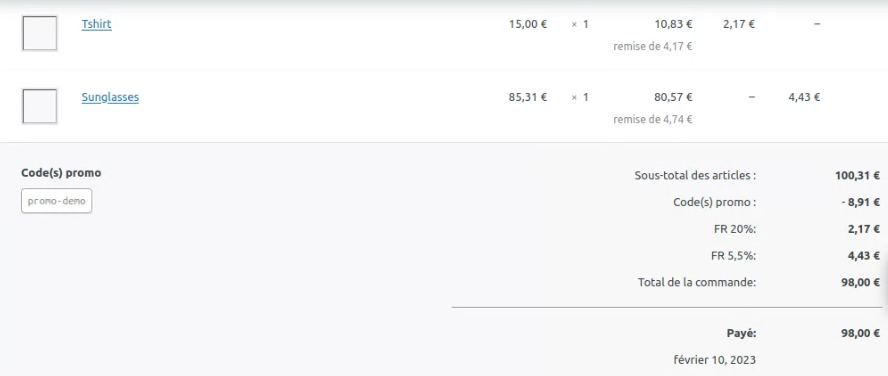
A customer purchases two products that have different VAT rates. (or different taxes in general) AND who uses a discount coupon of €10.
You can specify codes for each tax type.
Each type of tax for each product
Credit account debit account
A promo code for the order
I have installed WooCommerce Accounting. How do I export my different VAT rates?
j’ai plusieurs pays avec des tva différentes et je veux exporter mes commandes, comment faire pour exporter dans un seul fichier toutes mes commandes avec plusieurs taux de tva, ma boutique a des taux particuliers et je veux exporter toutes mes commandes, export de commandes avec Comptabilité pour Woocommerce comportant des taux complexes
You can then go to the settings of WC Accounting: WooCommerce > Setting > Accounting > Taxes and delivery options to define the specific account number for each VAT rate.
The procedure is identical if you wish to establish different accounts corresponding to the different types of delivery that you propose.
I would like to set specific accounting codes by country, but the tab is empty.
Pourquoi certains onglets sont vides dans Comptabilité pour Woocommerce ? Je veux régler des codes pays mais je ne peux rien ajouter, ajouter des codes comptable dans Comptabilité pour Woocommerce, onglet vide dans réglages Comptabilité pour Woocommerce
Context
WooCommerce Accounting only offers adjustment of accounting codes for the country of sale of your shop.
If you can’t find the countries you are looking for, your store might not be set to sell in those countries.
Solution
Set up countries in the "General" tab of WooCommerce settings.
You must have activated the delivery for the list of countries to be displayed, even if your site does not use delivery. Specify in the WooCommerce settings: “Deliver to all countries where you sell.”
I get the message “no items to export.”
J’ai un message d’erreur dans Comptabilité pour Woocommerce, Aucun élément à exporter, j’ai un problème d’export, quand je veux exporter j’ai un message d’erreur dans Woocommerce
Case 1
I get the error message 'no elements to export' when there are indeed commands that meet the criteria.
Context
It may be that the date format chosen is not found by the export module (for example, invoice date). This causes date range sorting to not identify any orders. This may be caused by using a conflicting third party extension.
Solution
By selecting another date value (paid, order or validation), the export is done well.
Case 2
I can’t do accounting exports. I have set up the elements correctly but I can’t export.
My export file is empty.
Context
A bug, fixed since version 1.2, made the export columns not defined by default.
Solution
It is necessary to explicitly set the order of the columns in the general settings. For this, move the columns using drag and drop. If the columns are already in the order you want, swapping the empty columns should be enough.
Je n'ai pas de décimales, les montants sont arrondis dans mon WooCommerce ?
Mes factures sont erronées, pourquoi tous mes bilans sont faussés ? Comptabilité pour Woocommerce semble arrondir les montants dans Woocommerce, les prix sont arrondis dans Woocommerce
When I do a WooCommerce export, the amounts are rounded.
Context:
This is not a plugin issue but rather a WooCommerce setup problem.
Solution :
To resolve this, simply go into WooCommerce->Settings then to go down on number of decimal and to add the number you wish.
Je n'ai pas le calcul des paiements par type dans l'export ?
Pourquoi je ne vois pas le calcul des paiements dans mon backoffice ? Pourquoi je n’ai pas la même vue sur les paiements par type comme dans la démo de Comptabilité pour Woocommerce ?
Context
You have installed WooCommerce Accounting, but you do not see the calculation of all the payments made by CB or check in the export, as visible on the demo site.
Pourquoi mes informations n'apparaissent pas dans l'export ?
Erreur d’export Comptabilité pour Woocommerce, Problème d’export dans Comptabilité pour Woocommerce, j’ai des informations manquantes dans l’export Woocommerce
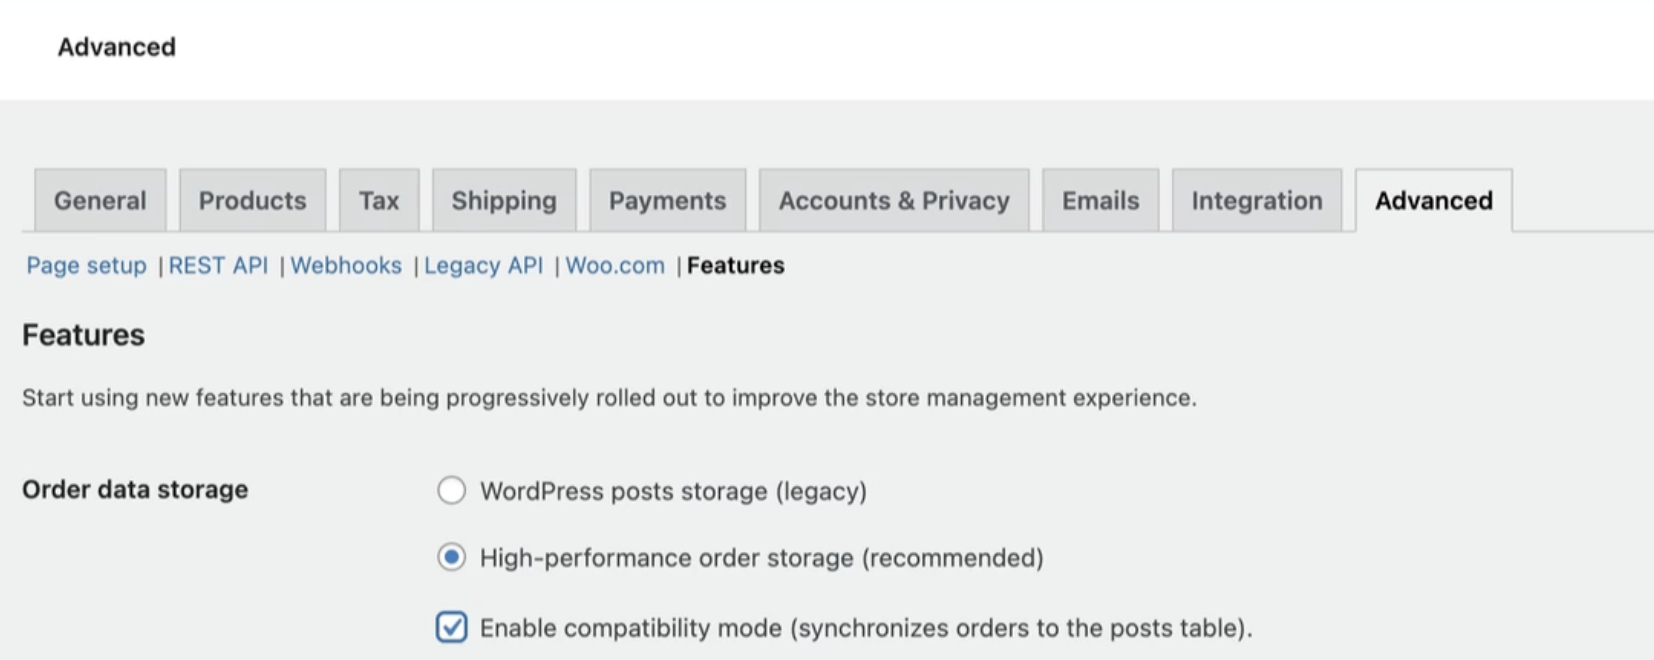
WooCommerce added a new feature recently in WooCommerce > Settings > Advanced > Features (the last one). The options are at the very top 'High Performance order storage (recommended)' and 'Enable compatibility mode (synchronizes orders to the posts tables)'.
If these options are not present, it is possible that your WooCommerce is not up to date or that the option has a different name, such as “Enable accounting mode.”
Quels sont les hooks disponibles dans l'export comptable ?
Vous souhaitez étendre les possibilité de WooCommerce Accounting avec une extension maison ou votre thème, Quels sont les options pour modifier mon export comptable ? options techniques de modifier les exports comptable avec filtres et hooks, comment m’accrocher aux hooks dans l’export comptable de Comptabilité pour Woocommerce ?
Plusieurs types de hooks sont disponibles pour personnaliser les exports comptables : les filtres, pour modifier le contenu des colonnes, les actions pour ajouter des lignes supplémentaires.
Liste des filtres disponibles dans l’export
Les filtres permettent d’altérer le contenu envoyé à chaque ligne.
woocommerce_accounting:export:order
Permet de modifier les données de chaque objet de commande relative à un export.
How is the overlap between Polaris categories and WooCommerce categories achieved?
Je souhaite relier les catégories existantes de Polaris à mon Woocommerce, comment faire ?
Comment s’associent les catégories entre Polaris et Woocommerce ? Que sois-je faire pour que mes catégories de boutique Polaris soient reconnues dans Woocommerce ?
Up to you!
The configuration of the WooCommerce Polaris extension allows you to determine the correspondence between Polaris and WooCommerce taxonomies.
For each Polaris taxonomy (categories, classification; season, collection, level) can be associated with a WooCommerce taxonomy (category, label, attributes...). Custom taxonomies, brought by other extensions are also supported.
For each taxonomy, you will choose:
if a different product must be created for each element (for example by color)
To which WooCommerce taxonomy should it be associated
If you select an attribute, you can also choose whether this attribute will be used as a variation and whether it should be visible publicly.
If none of this is selected, the taxonomy will simply be ignored.
How do I hide products without images?
Astuce masquer produits sans image, masquer produit dans Polaris
Si rien de tout cela n’est sélectionné, la taxonomie sera simplement ignorée.
Explications
The hook of action polaris_update_product uses the product identifier WooCommerce $product_id and the Polaris data $polaris_data.
We therefore use the function add_action() with the default priority (10) and 2 as the number of expected parameters.
Its URL will then become something like: https://votreboutique.shop/categorie-produit/007-lingerie/
Comment savoir si un produit non importé est un bug ou un problème de réglage ?
J’ai un problème à l’import dans Polaris Woocommerce, j’ai des produits non importés qui sont pourtant bien présents dans mon fichier excel, comment régler les problèmes d’imports de produits Polaris vers Woocommerce
Context
Vous vous attendez à voir certains produits dans la boutique en ligne, mais ils ne sont pas importés.
Cela peut-être dû à un plantage lors du processus d’importation ou simplement d’un mauvais réglage. Il convient en premier lieu de déterminer la cause de l’absence du produit pour pouvoir le corriger.
Solution
Pour savoir si un produit absent est lié à un bug ou un réglage, vous devez en premier identifier la cause.
Pour cela, vous devez identifier précisément un produit présent dans votre caisse et absent de la boutique.
Vous aurez besoin de son numéro ou du numéro de modèle.
1. Importer manuellement tous les produits
Lors du processus d’importation, le connecteur appelle la caisse Polaris pour récupérer tous les produits avec ces critères :
correspondant aux filtres
modifiées depuis le dernier import
pour vérifier les critères de filtre, il faut vérifier l’ensemble des produit.
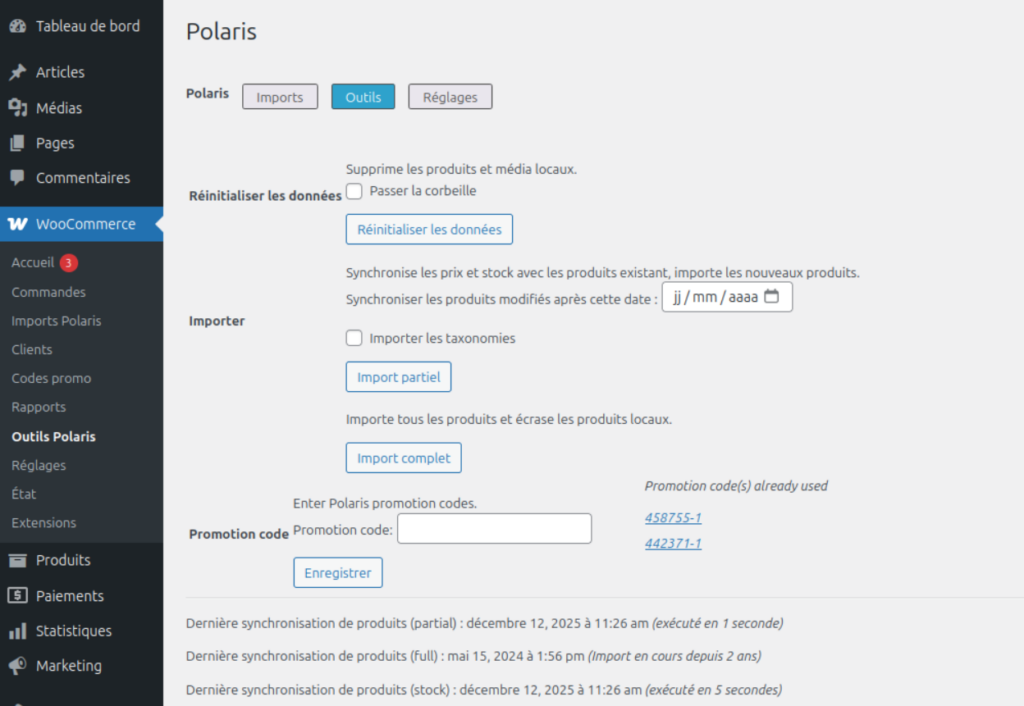
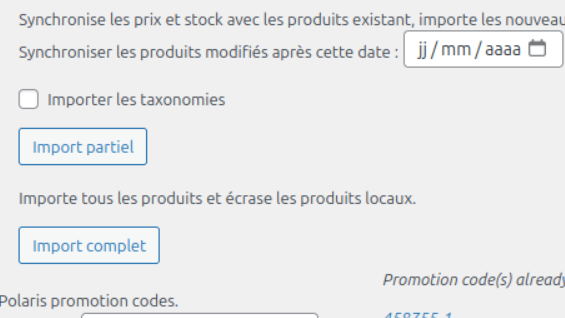
Pour cela, lancez un import partiel manuel, avec la date vide , la case taxonomies décochée.
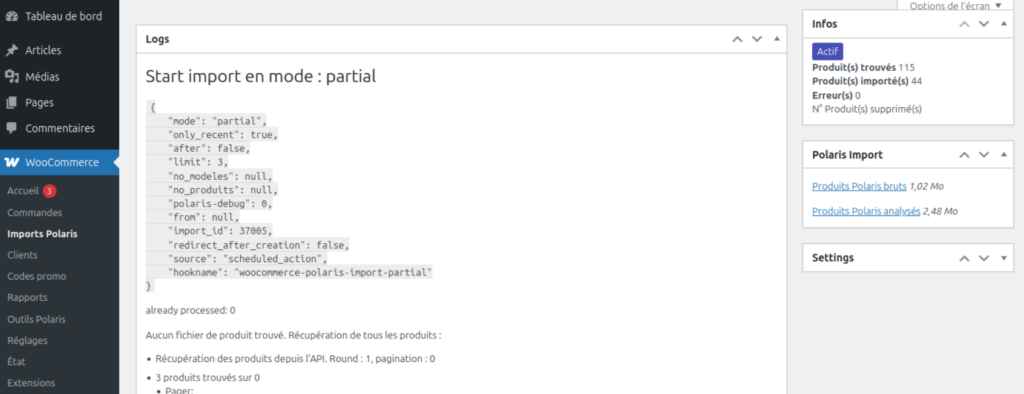
Vous serez alors redirigé vers la vue détaillée de l’import.
2. Extraire le fichier brut des produits
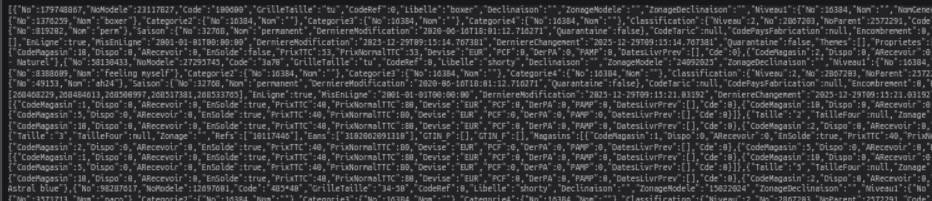
Lors de la première étape, les produits sont récupérés successivement et stockés dans un fichier au format json. Ce fichier est accessible depuis la vue détaillée d’un import, il s’agit du fichier Produits Polaris brut.
Cliquez dessus pour télécharger et ouvrir le fichier.
De base, le fichier est un texte pas très lisible par les humains (mais très compréhensible pour les machines).
Heureusement, certains navigateurs permettent de mieux lire ce format de fichier
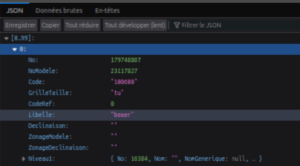
Le navigateur Firefox affiche le fichier dans un format mis en forme et très pratique puisque l’on peut déplier/replier les éléments imbriqués
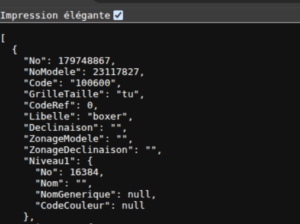
Le navigateur Chrome propose une option « Impression élégante » qui rend le texte plus lisible.
3. Chercher le produit par son numéro
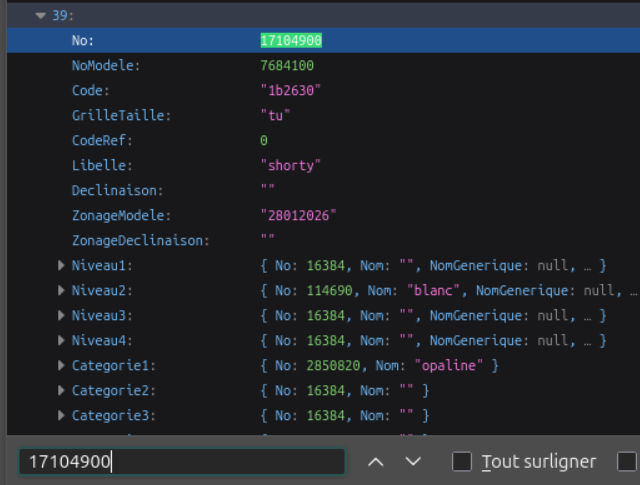
Une fois le fichier affichez, utilisez la fonction de recherche dans la page (raccourcis commande + F) ou en passant par le menu du navigateur.
Saisissez le numéro du produit que vous recherchez et validez
Plusieurs résultats peuvent correspondre, surtout si vous utilisez le numéro de modèle.
Analyse
Si le produit est présent dans le fichier, comme dans l’exemple ci-contre, le problème vient sans doute d’un plantage lors de l’import. Dans ce cas, vous pouvez affiner les réglages d’import.
Si le produit est absent du fichier, il s’agit d’un problème lié aux filtres. Dans ce cas, il convient de vérifier les filtres d’importation.
How can I use Polaris product descriptions to optimize my SEO?
Comment optimiser son seo avec polaris ? Optimisation des libellé internet des produits Polaris,
Depending on the configuration of the gateway on Polaris, the data may vary:
If these options are enabled then it is the internet label that is returned (if filled in) otherwise it is the model label.
If these options are not activated, then the model label is returned.
Is the WooCommerce store considered a new store and/or a seller in one of the stores?
J’essaie de comprendre comment Woocommerce est lié avec Polaris ? Comment Woocommerce reconnaît-il la boutique ou le vendeur avec Polaris ? Est-ce que Woocommerce reconnaît une nouvelle boutique ou un nouveau vendeur en cas de multiboutique ?
The WooCommerce Polaris connector links your WooCommerce store to a Polaris store.
During the configuration of the extension, you choose which store your e-commerce site is associated with; it is this store that will be used as a reference for synchronizing the stock and products.
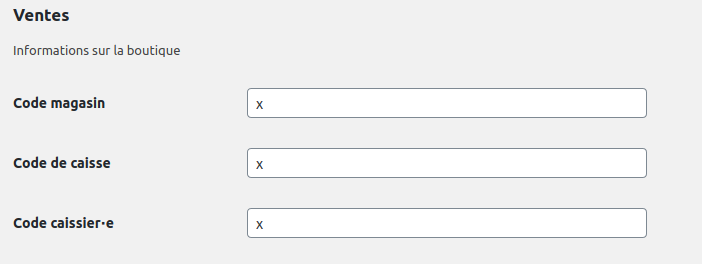
Furthermore, you will also be required to enter the register and vendor identifiers that will be used to create the sales made from the shop.
La synchronisation automatique du connecteur Polaris échoue ou n'aboutit pas
Comment fonctionne la synchronisation automatique entre Woocommerce et Polaris ?
J’utilise le connecteur Polaris pour WooCommerce et je souhaite synchroniser de façon automatique les produits, cependant, certains produits ne sont pas importés. Comment faire quand la synchronisation automatique avec polaris échoue ?
I use the Polaris connector for Woocommerce and I want to automatically synchronize the products, however, some products are not imported.
Several scenarios can explain the absence of products in the automatic import.
To ensure the cause, it is best to refer to the import logs.
Solution 1: check the filters
If the import went well and some products are not imported, it is probably necessary to update the import filters.
Solution 2: Adjust sync settings
The number of products to be processed during the call to the Polaris API and during the import process needs to be refined according to your server’s resources.
If the imports do not succeed, reducing the values will significantly increase your chances of success. The import will be just a little longer.
Are sales made on the WooCommerce store correctly sent to Polaris with daily sales figures per item?
Gestion des ventes quotidiennes entre Woocommerce et Polaris, Est-ce que les indications des ventes quotidiennes par article est compatible avec Polaris ? Je recherche une extension qui gère l’indication des ventes quotidiennes par articles avec Woocommerce
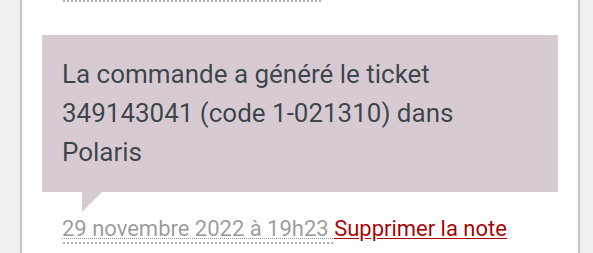
Sales made on the WooCommerce store are sent to Polaris in real time with the reference of each Polaris item. A synchronization note is then added to the WooCommerce order with the sales number.
Thus, you can easily find the sale at the checkout
My Polaris connector automatic synchronization is not working
J’utilise le connecteur Polaris pour WooCommerce et je souhaite exporter ou synchroniser de façon automatique les données des ventes de votre boutique en ligne sur votre logiciel de caisse.
It may be that the automatic synchronization of your sales is not taken into account and therefore, all data related to transactions on your online store does not appear on your cash register software.
Solutions:
To remedy this situation, simply keep your POS software running. All sales generated during your inactivity will be taken into account during the automatic synchronization at any time. Warning, the switched off cash register will prevent the synchro automation of the stock.
Pourquoi un produit est-il marqué en rupture lors de l'ajout au panier ?
Check stock levels via the API.
If there really is stock, there may be a conflict with an extension (Extemple Funnel Kit) that isn’t sending the variation data in the AJAX request.
Technical requirements for polaris synchronization
Polaris semble ne pas fonctionner correctement sur ma boutique ? Impossible de faire fonctionner polaris dans ma boutique woocommerce ? Pourquoi j’ai des actions qui ne se passe pas comme prévues dans polaris ? Où puis-je modifier les prérequis techniques dans mon site pour que polaris fonctionne bien ?
EventPost: create an events calendar based on your content
Is EventPost compatible with multisite?
J’ai un mutlisite et je souhaite étendre EventPost à tous mes sites installés dessus
YES!
There’s a handy little trick for extending the functionality of Event Post to multisite networks. Next, in the "Blogs" field within the EventPost block settings, you can add the IDs of your other multisite blogs so that their events appear in the block.
My website contains content developed specifically for my project; are the custom post types displayed in the EventPost blocks?
YES!
You can add any type of content to be displayed in EventPost in the form of a card, list, calendar, timeline or detailed view.
What is a schema code?
C’est quoi le code schema ? J’ai une structure un peu différente pour présenter mes posts aux moteurs de recherche est-ce que je peux la changer ? Modifier le balisage du schema
Schema markup in WordPress is a special type of HTML code that provides additional information to search engines. It helps them understand the content of your site, such as the type of page (post, product, etc.), to improve search results.
Search engines then display this enriched content in the results pages.
You can customise, reverse or modify the appearance of the elements. Examples of the basic schema code integrated into our module are available should you wish to modify its structure.
FAQtastic: the FAQ that interacts with your visitors
How is FAQtastic's FAQ connected to the chatbot?
Comment fonctionne FAQtastic ? Quel est le moteur de FAQtastic ? La faq et le chatbot de faqtastic se connecte comment ? Comment je relie ma faq au chatbot pour que le chatbot propose mes questions au visiteur ?
FAQtastic is incredibly flexible in its genre. On the one hand, all FAQs and their contexts are automatically listed in the chatbot. On the other hand, the chatbot understands and interprets the visitor's question to offer them the most relevant questions in the FAQ. You don't have to do anything, everything is already taken care of in FAQtastic 😉
Does FAQtastic improve and facilitate the entry of FAQs or context (especially for substantial FAQs)?
J’aimerais améliorer mes FAQ dans le temps pour améliorer mon SEO, SEA, est-ce qu’il y a une fonctionnalité prévue dans FAQtastic pour gérer ça ? COmment améliorer son SEO avec FAQtastic, comment remplir les contextes dans mes questions, je cherche une solution facile à mettre en place et qui peut s’alimenter facilement pour mes faqs, quelle proposition d’amélioration des faqs et contextes ?
YES!
FAQtastic is constantly evolving! La saisie est simplifiée dès le départ et améliorable manuellement en fonction des suggestions remontées par FAQtastic et Elastic Search. Vous pourrez donc améliorer continuellement vos contextes. Vous pourrez les adapter ou créer de nouvelles FAQs avec les nouvelles données suggérées par FAQtastic. Vos utilisateurs aussi peuvent vous soumettre leurs questions si le chatbot ne trouve pas de réponse pertinente. Les questions des utilisateurs sont mises en attente. Cela vous permet d’alimenter votre base de questions continuellement.
Can I customise FAQtastic to fit my theme? And is it compatible with my theme?
Je veux changer les couleurs et textes comment je fais ? Pour adapter le module à mon thème je veux changer des typos et taille ainsi que des fonds et couleurs, faqtastic prévoit-il des réglages pour modifier le design ou est-ce qu’il faut un développeur ou webdesigner ? Je recherche un module de faq qui s’adapte à mon theme
YES!
FAQtastic is (In)visible! Fully customisable, from icons to fonts and colours, to spacing, margins and borders, everything is designed to fit your theme. No matter which builder you use, FAQtastic is compatible with all native WordPress themes.
If the visitor makes typing errors, will the chatbot be unable to suggest topics correctly?
comment je dois écrire dans le chatbot pour qu’il me propose un contenu pertinent ? comment le chatbot peut proposer des réponses adaptées à un langage écrit approximatif ? le chatbot ne comprends pas le langage écrit naturel, les réponses pertinentes c’est que si on écrit tout bien dans le champ de recherche et encore des fois ça propose que des trucs à côté de la demande, jsuis sur il comprends pas toutes les questions
WRONG!
And that's what makes this chatbot so powerful: it ignores typos and grammatical errors, understands the meaning of the sentence, and is able to ask the right questions despite the mistakes. No more language barriers—the chatbot understands your visitors.
General FAQs
How long can I use the extension I purchased?
Combien de temps dure une licence d’achat d’une extension ? Je peux bénéficier de ma licence pendant combien de temps ? J’ai acheté une extension mais je ne me rappelle plus combien de temps dure la licence
Once you have purchased and downloaded one of our extensions, you can use it as you wish, with no time limit. The user has access to updates for a limited period of one year from the date of purchase.
Install a premium extension
Est-ce qu’installer une extension premium est simple ? Je veux téléverser une archive ZIP dans wordpress.
L’installation et l’activation d’une extension premium est très simple. Elle se fait en 3 étapes.
Soit depuis la page « ajouter » du gestionnaire des extensions
Soit manuellement, en ajoutant le contenu extrait du ZIP dans le répertoire wp-content/plugins de votre site.
Activer l’extension
Depuis la page de gestion des extensions.
I have purchased one of your plugins. How can I obtain and benefit from updates?
Je ne sais pas comment renouveler ma licence d’extension, comment télécharger et installer la nouvelle version de l’extension, mettre à jour mes plugins
Nous vous notifions des mises à jour et de leurs disponibilités par mail. Avant la diffusion de notre mail, nous réinitialisons les droits de téléchargement de l’extension pour vous permettre de bénéficier gratuitement de la mise à jour.
Pour obtenir la dernière version de l’extension ou l’installer juste après votre commande :
puis rendez-vous sur l’onglet “téléchargement” pour obtenir la dernière version de l’extension
Téléchargez la version souhaitée sur votre ordinateur
Rendez-vous dans l’onglet Extensions de votre WordPress
Cliquez sur Ajouter des extensions
Puis sur le bouton Téléverser une extension
Téléversez l’archive ZIP précédemment téléchargée et validez
I need a new feature, what can I do?
J’ai une idée de fonctionnalité qui pourrait améliorer votre plugin, comment vous contacter pour vous faire part de mes remarques pour améliorer votre produit ? Est-ce qu’on peut vous contacter pour vous signaler des améliorations sur vos extensions ? Contacter le support, Rencontrer l’équipe de nous pour donner des idées
As with a bug, if you require a specific feature, you can contact us via the support form. Depending on your needs, we can provide you with a specific proposal or schedule an update for the extension.
I have noticed a bug. How can I contact you?
Comment rapporter un bug sur une extensions de Apps by NOUS ? Comment vous contacter en cas de bug sur une extension ? Mon plugin semble ne pas fonctionner comme prévu, comment je peux vous montrer ça ? Est-ce qu’on peut ouvrir des tickets support pour vous rapporter des bugs sur vos plugins ?
This should not happen. However, if you notice a malfunction, which may be related to your theme or another extension, the best way to notify us is to use the support form from your customer account.
Are my prices exclusive of tax or inclusive of tax?
Les prix sont en ht ou ttc ?
All our prices are displayed excluding VAT, which means that 20% VAT is applied.
Get our premium extensions in French
Je veux traduire une extension NOUS en français, traduction de mon extension en français
By convention, our developments are done in English, and this also applies to our premium extensions. As they are not supported by the WordPress translation manager, these extensions are not automatically translated.
We have therefore released a free extension to address this issue. The technical aspects are explained in a article on our blog.
In practical terms, all you need to do is follow these three steps:
In Glotpress settings, enter the URL: https://traduire.avecnous.eu/glotpress/ and save it.
3. Download translations
On the upgrade management page, a table will appear at the bottom if new translation versions are available.
Check the translations you want to download and click “Upgrade Translations.”
Where can I find my invoice?
Comment recevoir ma facture après l’achat d’un produit sur Apps by NOUS ? J’ai acheté un produit sur votre boutique et je souhaite recevoir la facture, comment faire pour recevoir ma facure après achat sur Apps by NOUS ?
We will send your invoice by email. Please ensure you provide your intra-Community VAT number if you have one.
Hello Bruce : Générateur d'images pour tous vos réseaux en 1 clic
Can I display the colours from my default theme in the palettes?
I want Hello Bruce to be able to retrieve my theme style settings to generate the post image. I want to customise the banner colours to match those of my WordPress/WooCommerce theme.
Yes, you can add to or replace the palettes using the hooks brucebanner_default_bg_colors and brucebanner_default_text_colors.
Can I display custom post types in the selection list?
I use custom post types in my posts – does HelloBruce include them in the list of posts? Are ALL post types included in HelloBruce? You have custom content developed for your site and theme, and you’d like to use the HelloBruce plugin to generate images from these posts.
Yes, you can use this ‘brucebanner_posts_args’ filter to modify the query parameters used to retrieve posts.
Example:
add_filter('brucebanner_posts_args', 'mytheme_brucebanner_all_posts_args');

function brucebanner_all_posts_args($initial_args){
  // ask for all the posts on the site
  return array_merge($initial_args, [
      'post_type' => 'any',
    ]);
}
Can I have more customisation options for my banner?
Yes, this is planned for the coming months – you’ll have more customisation options in the HelloBruce Banner Generator.
For the time being, you can still adjust the settings ‘manually’ using the filters provided in the other FAQs.
Can I generate PNG files using my own service?
How do I configure the capture URL? I’d like to add my own service URL in the capture settings field – how do I add my PNG capture service? Can I add an image generation URL for formats other than PNG?
Of course, if your service accepts HTML code as input, you can use the ‘brucebanner_service_generator’ filter and return the URL of your service.
Can I change the style applied to the banner?
I want to start from scratch to customise my banner. How do I start from scratch to create my own banner in my own style? I want to completely change the layout of the banners. How do I edit the CSS of the banner generator?
Yes, you can override the CSS by adding CSS code using this hook:
add_action('brucebanner_banner_head', 'mytheme_brucebanner_add_generated_styles', 11,1);
function mytheme_brucebanner_add_generated_styles($sanitized_get){
  echo '<style>
    /* your style here */
  </style>';
}
You can also remove the styling applied by this plugin by following these steps:
J’ai plusieurs clients et un site central de sondage, comment organiser mes clients par groupes ?
Depending on your working method, you can create a single general group (e.g. Employees) and place all surveys relating to that group within it. You can also distinguish between organisations by creating a parent group and child sub-groups. If you work with several groups, or several groups per company or organisation, you can use sub-groups to sort your participants by organisation.
For example: Parent category → Company A Subcategories of A → Employees, Works Council, Social and Economic Committee, Management, Accounting
OR sort by year, if you carry out annual surveys: Parent category → 2026 Subcategories of A → Employees, Works Council, Social and Economic Committee, Management, Accounting
It all depends on how you work, and what works best for you and allows you to develop.
How should I name my team if I only have one group within a company?
→ Choose whichever is best: either simply, for example, “CompanyXXX”, or use a more general name such as “Employees”, which is common to other companies.
How do I prepare the import file? Should I ask my clients for an Excel file containing only email addresses?
Clients often send an RSU (social security statement) containing various data; does this require the file to be reprocessed before import?
Yes, in all cases, IRIS imports everything it needs by mapping the data from the imported file. Only emails are required.
You can import a pre-prepared file containing:
email adresses
start date
end date
Or prepare a file containing only the emails.
In what circumstances is a token considered to have failed?
A token may have a ‘failed’ status for the following reasons:
The survey form was not completed on time (deadline missed)
The token was manually set to ‘failed’ status
Is it better to create parent groups, or a parent group with sub-groups underneath it? Is there a difference?
What is the difference between a parent group and sub-groups? How do these groups affect my organisation?
Depending on whether the surveys are specific to a particular company and you are managing several surveys for them on your site, it might be worth distinguishing that group from the others. In that case, creating a parent category and sub-categories could be useful for navigating the hierarchy of participants or for keeping track of the chronology of surveys.
If you are using IRIS as a survey tool on your website and it is intended solely for your customers and staff within your company or organisation, then you can create just one parent category (for example, ‘Employees’ could be an overarching category covering ALL surveys intended for employees, whilst ‘Customers’ could be a second parent category intended for your customers). A categorisation scheme with sub-categories could also be considered.
It all depends on how you work, and what works best for you and allows you to develop.
Is there a limit on the number of emails that can be imported from participants, and in IRIS in general?
Est-ce qu’il y a une limite d’import de fichier ? Y’a-t-il une limite d’import de participants ?
No, unless the file is very large, in which case it is best to split the file into several smaller files to ensure the import goes smoothly.
There are generally no limits in IRIS, whether for groups, tokens, imports, mailings, etc. However, a spring ‘clear-out’ is recommended if you do not intend to keep a long-term record of your tokens; for example, you could delete tokens that have already been used once a year.
Can we set an end date for the survey?
Yes, there are two ways of doing it:
When importing the file in batches: in the spreadsheet, specify a start and end date on each row.
Manually via the token: open the participant’s token and adjust its validity dates manually.
Do the tokens disappear automatically after a while?
No, but it is advisable to dispose of them annually when there are a lot of them (either this year or next) if they are not intended for export or for keeping.
There are generally no limits in IRIS, whether for groups, tokens, imports, mailings, etc. However, a spring ‘clear-out’ is recommended; for example, you could delete tokens that have already been used once a year.
When sending a reminder, should I filter the original list of participants so that I only send it to those who haven’t responded to the survey?
Is there anything I need to do to ensure messages are only sent to users who haven’t used the token?
No, there’s no need to do anything – IRIS automatically sends out only the unused tokens. Isn’t life lovely?
What should you do in the event of a mass mailing?
How can I prepare my bulk direct mail campaign properly?
(Is the server powerful enough?)
If your mailing involves thousands of recipients and this is the first time you’ve sent so many emails at once, it would be best to check your email quotas with your email service provider (Brevo, web hosting provider, etc.) beforehand. Make sure your website is linked to your Brevo account if you’re using this service to send emails, or that you have an SMTP server configured on your WordPress site, if applicable.
If I run a survey for employees and freelancers, for example, can I create different groups in ‘Groups’?
How can I distinguish between my participants in IRIS? How can I organise my groups of people?
Yes, in IRIS > Groupes : You can create groups of people to categorise your participants. These groups will then be sent the surveys.
If I just insert the {link} variable into the mail merge, will it send the link specific to that person?
How does IRIS send the personalised link to the recipient during a direct mail or email campaign?
Yes, the recipient receives an email containing their own unique link to the specific survey, which can only be used once. 1 token = 1 use.
If we import a raw file from the client and map the correct columns between IRIS and the file, will the unmapped columns be imported as well, or not?
No, because the data mapping during import allows you to assign the ‘email’, ‘start date’ and ‘end date’ columns required by IRIS. The rest is ignored. Remember to create at least one ‘email’ column; this is the only mandatory one.
Additional modules for Woocommerce products: repetitive fields and free or quantity-based field groups
Pourquoi les champs personnalisés ne s'affichent-ils pas sur le site ?
Comment afficher les champs personnalisés ? Je fais comment pour voir les champs personnalisés sur mon site ? Quels réglages on doit faire pour afficher ou cacher les champs personnalisés
Keep in mind that the display of custom-meta fields is based on categories.
Make sure to select the appropriate categories for each custom-meta field.
Can I update price based on custom values with this plugin?
Je peux changer les prix de ma boutique avec des champs personnalisés ? Comment modifier des prix spécifiques filtrés par valeurs personnalisées ?
No, the purpose of this plugin is only to get qualified data during the order process, like the name and age of each person in a booking, or a message on a gift card.
The only limit is your imagination!
WooCommerce Paybox Gateway for Subscriptions
Comment est géré le système d'abonnement ?
En quête d’un système gérant les abonnements via paybox, j’ai découvert avec plaisir votre solution.
J’aurais néanmoins souhaiter savoir comment étaient gérer le système d’abonnement, comment tout ceci fonctionne avec woocommerce subscription et paybox. Quelqu’un s’abonne, paie son premier mois d’abonnement, ok. Mais que se passe-t-il le mois suivant ? Une nouvelle commande est créée automatiquement ? Comment le système enregistre-t-il les infos carte bleue? que se passe-t-il si le compte n’a pas les fonds nécessaires ?
In search of a system managing subscriptions via paybox, I discovered with pleasure your solution. Nevertheless, I would have liked to know how the subscription system was managed, how all this works with woocommerce subscription and paybox. Someone subscribes, pays their first month of subscription, ok. But what happens the following month? A new order is created automatically? How does the system record credit card info? what happens if the account doesn’t have the necessary funds?
The answer will be quite simple, it is the native behaviors of each of the solutions that will apply:
WooCommerce Subscription will create a 'parent' order and then 'sub-orders' for each monthly payment.
Paybox stores information on its own server, critical information (CB number) is only stored on your site.
Woocommerce remains "passive", when a payment is refused on the Paybox side, the subscription stops
In short, our extension allows "just" to make the 2 solutions work together, without altering their initial functioning.
Tax receipts for WooCommerce
Will all orders generate a tax receipt?
Comment on produit les reçus fiscaux ? De quelle manière les commandes sont impacté par les reçus fiscaux ?
No, only 'eligible' orders will give rise to a tax receipt.
Nous utilisons très peu de cookies sur le site, pour ainsi dire aucun. Cependant nous affichons des vidéos Youtube et utilisons des services comme Brevo (inscription aux lettres d'infos) qui utilise des cookies tiers si vous interagissez avec ces services. Si cela vous convient, cliquez simplement sur "Tout accepter", sinon, vous pouvez paramétrer finement vos choix.
Lisez notre politique de confidentialité

 EN
EN  FR
FR